
After months and months of planning and hard work, my walk- in closet is finally complete! I am so excited to be sharing my closet reveal with you!
To give you a little background on this space previously - it was my office, and shoe closet. Being that we have a very tiny walk- in closet in our master bedroom, it just didn't fit all my shoes, so I ended up storing them in my office instead. I also hated that all my clothes didn't fit in the master closet as well. I had some in a dresser, some in our night tables, and even in some plastic containers under our bed. It was just getting ridiculous to find anything, so I decided to turn the office into my walk -in closet. That way everything was in one place and could easily be found.
Here is what the before looked like:

And....here is the AFTER!!
As you can see, I wanted everything out in the open so I could easily find what I was looking for each day. I didn't want my clothes and shoes to be hidden by any doors so I couldn't see what I have. I am so happy with how the space turned out, I just love it so much!


I decided to go with IKEA furniture to store all my clothes and shoes. I went with a PAX Wardrobe System for all my clothes because I could customize it to my needs. I designed the whole thing myself using their PAX Wardrobe Planner. I got to chose the size, colour, and pick from a large selection of options such as: pull- out trays, pant hangers and the kind of drawers I wanted to add to my system. I even got to chose the configuration!! Buy creating a wardrobe system, it allowed me to add so much storage that I didn't need to add centre island. It actually worked out better anyways because I think it would made the room feel too cluttered.
For my shoes, I went with the Billy Bookcase design to store all my shoes. I'll explain that section in more detail later on in the post.


My PAX Wardrobe System consists of 3 sections. Here is the first section. As you can see, I added 2 baskets at the top for extra storage. I have all my extra winter hats and gloves in there right now. Below that, I added a clothes rail for all my causal everyday long and short sleeve tops. I also added a pull-out tray for all my jewellery. I got 3 jewellery inserts for the tray- one for my all my earrings, one for all my bracelets, and another for my rings and watches. I also added another clothes rail after that for all my dressy tops and tank tops. Followed by a large glass drawer that holds all my track pants and pajamas.


The second section is a lot smaller than the side sections. At the very top, I put my Chanel purse. Below that, I added another clothes rail for all my longer pieces such as my long dresses, kimonos and blanket scarves. The bottom shelf, is where I store my belts and hats. I also added 2 smaller glass drawers at the very bottom - one for my bras, and the other for my socks and underwear.

The third section is the same size as the first, I just configured it differently. I have 2 more storage baskets at the top. Below that, another clothes rail for my shorter dresses and workout clothes. I also added another pull-out tray for all my necklaces, but with this one I used a clear plastic divider. For all my pants, I added 2 pull-out pant hangers followed by 2 more glass drawers. One for all my shorts, and the other for all my bathing suits and cover ups.


Ok lets start talking about my favourite part- my shoes!!! Like I mentioned before, I used the Billy Bookcases. I purchased 4 of them and attached them all together to make it look like one piece. They were the perfect height and depth for the space. I also liked that I could arrange the shelves to my needs, so I could fit my sandals, heels, boots and purses comfortably.


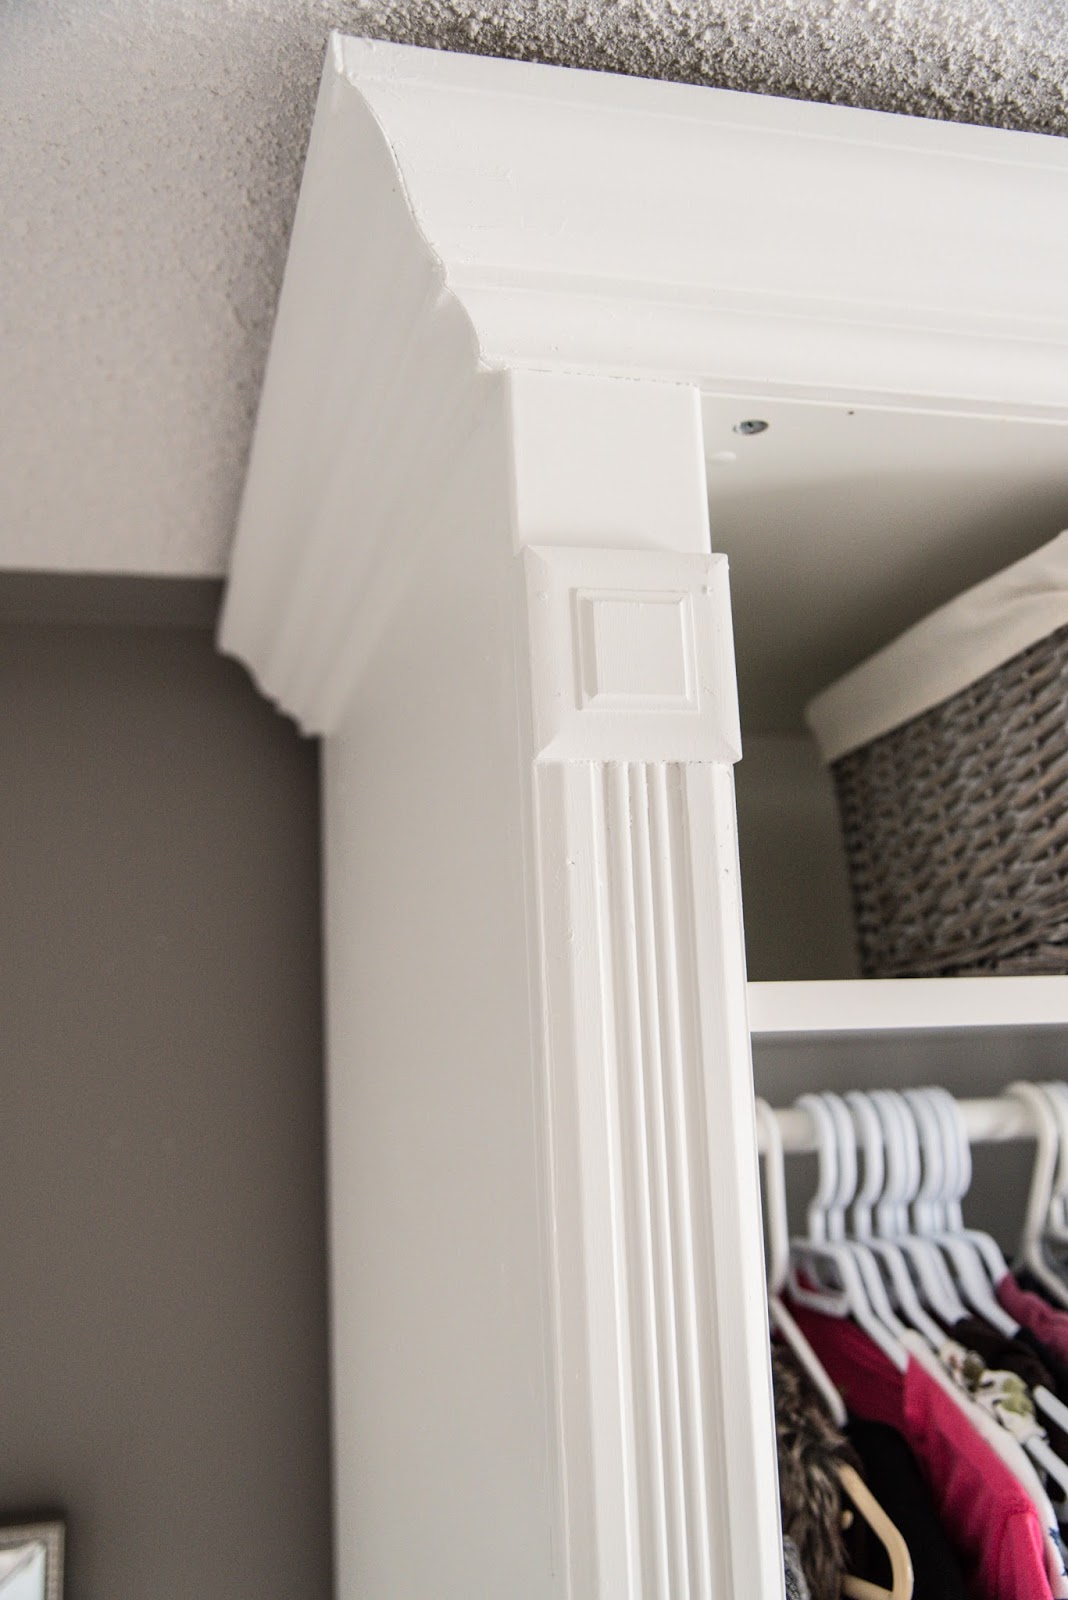
I wanted to have more of a custom look to both IKEA pieces, so I added some mouldings that I found from Home Depot. I can't believe what a difference it made. It took it from looking so basic to very high end and luxury.
To create the look, we needed to build out all the sides of the IKEA pieces. They were too thin to attach any moulding to, so we cut some MDF to size and fit them to the sides of both pieces. Once we beefed that up, we then purchased a Casing Set that included 2 casings, 2 Rosettes and 2 Plinth Blocks. We then attached them using PL Premium and a nail gun. To finish off the look, we added a thick crown moulding to the top of each piece to make it look like they were both a single unit.


How gorgeous is this Chandelier that I picked up at Universal Lamp?! I knew for sure I wanted a chandelier in my new walk-in closet, and this one cannot be more perfect! The photos don't even do it justice!!
This 3 light pendant chandelier has a polished chrome finish with beautiful bead strands of cut crystal. I love how light and airy it looks hanging in the room. It makes the space so much more elegant and girly - totally the look I was going for.
Most of our lighting in our home is from Universal Lamp which is located in Toronto. They have so much to choose from at their location, and at great prices. If you're on the hunt for some new lighting in your house, I definitely recommend checking them out.


I wanted to make sure I had a place to sit in my walk-in when putting on my shoes and clothes. This grey bench from Homesense works great! It's not only the perfect length, but matches great to the wall colour, and wallpaper in the space as well. I am also crazy about the nail head detail on it too!
I also picked up this beautiful full length beaded mirror. What walk-in closet isn't complete without a mirror right?!
Homesense is one of my favourite stores to find home décor. I don't think I have ever walked out of a store without buying something


When it came to choosing a colour to paint the room, I knew I wanted a dark grey. I thought it would look really nice against all the white IKEA furniture. I also wanted to create some dramatic impact, so I decided to do 1 wall of wallpaper. Farrow & Ball has been my "go to" for paint for many years. Every colour in my house is a Farrow & Ball colour. Their paint is such high quality.
I chose the colour "Worsted" for the walls, and this gorgeous Peony wallpaper for the 1 wall. Together they match perfectly!
If you want more information on Farrow & Ball you can read one of my older posts about them here or visit their website.


I was sick and tired of all of my nail polish in a plastic container, so I found a cute way to display them in my new walk-in. I purchased 3 "Picture Ledges" from IKEA, and hung them below one another. Then I added all my nail polish by colour to each row. I love that I can easily see all the colours I have, and now it looks so much better, and more organized than the way I kept them before.


There you have it, my new walk in closet! What do you think?


Now it's GIVEAWAY TIME!
I want to help you get started on your dream space too! Head over to my Instagram account here and enter to win 2 gallons of Farrow & Ball paint! (Approximately a $200 value)
Disclaimer: Some items in this post have been provided to me for review but all opinions are my own.
No comments:
Post a Comment